Originally published in the July 2012 issue of Pumps & Systems.
Successful alignment of rotating machinery depends significantly on how much emphasis is put on the alignment preparation and planning stages. Proper machinery alignment reduces the chance of an equipment failure, helping end users avoid unnecessary downtime and excessive maintenance time and costs. Preparing thoroughly and choosing an appropriate alignment method can help ensure a smooth process.
Prepare for Alignment
Before starting the alignment process, follow these steps:
- Make sure that the mounting faces of the bedplate and the rotating machine are free from paint, rust, weld spatters, burrs or other debris.
- Throw away any shims used during previous alignments that are rusty, painted or damaged.
- Check to see if the holes for the holding-down bolts are large enough to allow adequate movement for alignment. This helps avoid unnecessary delays later in the process.
- Check the distance between the shaft ends and align the machines approximately. You can do this by laying a straight edge against the machines and ensuring that the hub faces are parallel.
One issue that end users often overlook during alignment is the presence of a soft foot, where the machine is not sitting evenly on the bedplate. This can twist the machine frame, putting an unexpected load on the bearings and, ultimately, causing the frame to fracture.
End users can detect a soft foot by mounting a bracket carrying a dial indicator on one shaft and placing the plunger on the second shaft, with all the holding-down bolts lightly tightened. Next, work around the machine, fully tightening the bolts and then slackening them one at a time. Any excessive movement on the indicator signifies the presence of a soft foot, which will require that the end user fit shims to the machine before starting the alignment. Modern laser alignment equipment also often contains a program that can check for soft foot without undergoing this manual procedure.
Preparation Checklists
The following checklists can help end users prepare thoroughly for alignment. The lists can be adjusted as needed to suit specific machinery and the chosen alignment method.
Off-site Checklist
- Safety regulations
- Working permits
- Time limits for stopping production
- Alignment tolerances
- Thermal offsets
- Available space
- Shaft rotation
- Shim sizes
- Alignment system
- Batteries, if required for laser equipment
- Specifications for the machine setup
On-site Checklist
- Machine serial numbers
- Safety conditions
- Available space
- Foundation condition
- Bedplate condition
- Bolt condition
- Adjustment capacity
- Shim condition
- Presence of leaks
Pre-alignment Checklist
- Machine temperature
- Gross soft foot check
- Replacement of old shims
- Coupling assembly
- Adjustment of any mechanical looseness
- Run-out conditions
- Pipe strain
- Final soft foot check to adjust small errors after removing gross soft foot
- Repeatability test to ensure that tightening and loosening the feet bolts gives consistent results; this test also checks the condition of any shims or binding of bolts
Choose an Alignment Method
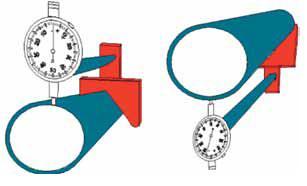
After preparing for alignment, end users must choose an alignment method appropriate for their machinery. Many alignment methods require brackets and arms for mounting the measuring equipment. As the length of the arms increases, the arms become more susceptible to sagging, which can cause significant measuring errors if end users do not take the sagging into account. Figure 1 illustrates the typical method to check for sagging arms. End users should add the values they record to the readings they take during alignment. The major methods for checking alignment are discussed in this section.

Figure 1. Check bracket and arm sag
Method 1 — Face and Periphery
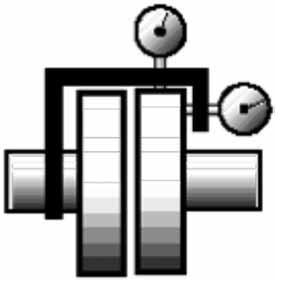
The face and periphery method is the oldest and most widely used dial indicator method. Figure 2 illustrates the correct setup for this method, which is good for large-diameter hubs with a short distance between shaft ends.

Figure 2. Open lineshaft, product-lubricated
Advantages:
- The end user only needs to rotate one shaft.
- Visualizing shaft positions is easier compared to other methods.
Disadvantages:
- It is difficult to obtain face readings if there is any axial float.
- An end user typically has to remove the coupling.
- It is more complicated to make the graphical calculations compared with other methods.
- Any out-of-roundness in the hub periphery or out-of-squareness in the hub face—meaning the hub flange is not round or flat and square relative to the shaft—will affect the readings.
Method 2 — Reverse Periphery (Indicator) Method
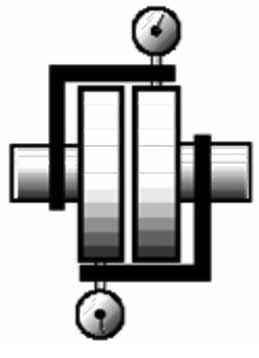
The reverse periphery (indicator) method is becoming increasingly popular and is the optimal method for most alignments. Figure 3 illustrates the correct setup for this method.
Advantages:
- It is generally more accurate than the face and periphery methods.
- Axial float, or out-of-roundness or out-of-squareness in the hub, does not affect the readings.
- It is easier to plot graphically compared with other methods.
- It is possible to make measurements with the coupling in place.
Disadvantages:
- End users must rotate both shafts.
- It is not accurate for close-coupled shafts.
Figure 3. Reverse Periphery Method
Method 3 — The Laser System
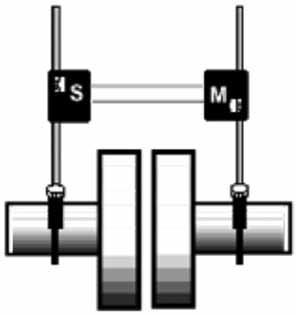
The modern laser system (see Figure 4) consists of either two laser/detector units or one laser and one mirror/prism reflector unit. One unit is attached to each shaft, and the laser/detectors are connected to a keyboard/display unit by a cable or via a wireless Bluetooth system. The system operates using the principles of reverse periphery, detecting the movement of the laser beams as a measure of the misalignment.
Advantages:
- The system fits a variety of shafts.
- End users do not have to remove the coupling.
- End users can measure long spans with no sagging issues.
- It is not affected by axial float.
- The system detects the soft foot condition easily.
Disadvantages:
- The system is not suitable for couplings with backlash.
- Heat or steam can affect its accuracy.
- The system is expensive.
Figure 4. Laser Alignment
Other Alignment Methods
Other alignment methods include shaft-to-coupling spacer, optical systems and electronic indicators. For equipment with long distances between the shaft ends, it is possible to fit the coupling and check the alignment of one shaft to the spacer and then check the spacer’s alignment with the second shaft.

